Sporty CT Build - Candy Flake Red

fatcaaat

Well-Known Member
I had my rat rod sitting in the garage for the better part of a year and never rode it. Mostly because it wasn't street legal, but really, it just didn't do it for me. So, I transformed it with a coat of paint and installed goodies I had laying around the garage along with a few functional bling items.

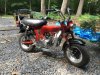
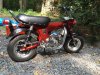
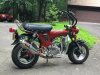
The frame is a 1970 and swinger is a 1980 as I didn't want the footpeg holes. It was blasted clean, primed, and layered with Stainess Steel industrial enamel base, then red duplicolor candy, then glitter effect, then cleared with spraymax 2k can. The paint is amazing in the sun with TONS of metal flake.

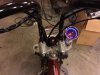
Engine is a TB108cc configuration with a takegawa 5-plate special clutch which came out of another bike I am currently doing a honda Nice conversion to. So the powerplant is reliable. Some functional bling includes the downtubes and the g-craft rear sets and an LED headlight conversion.

Rounding it out are a CHP seat, a set of chaly fenders that were powdercoated with a honda S90 tailight assembly, and some really nice aluminum wheels.

A few odds and ends to be done before it's finished:
1. Pick an exhaust - i may take my nice Yoshi from my other bike and put on here and add an Over racing exhaust to that other bike.
2. Add braided stainless lines for the oil cooler.
3. Add the honda emblem on the main body
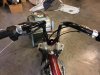
4. Fab up handlebars. I hate these chinese bars...they are too low and do not properly seat. I'm going to chop the bottoms off a set of KO bars and graft my own creations onto them and paint them gloss black.

For now, enjoy these until I finish the project.
 

Attachments

  • IMG_1188.jpg
    IMG_1188.jpg
    91.9 KB · Views: 558
  • IMG_1189.jpg
    IMG_1189.jpg
    79.4 KB · Views: 469

fatcaaat

Well-Known Member
new pics

Added some updates...home made bars, home made exhaust with Yoshi Can on it. Loving my new TIG welder. All that's left on this bike is jetting, a wiring extension, and the side reflectors. It runs pretty well, but the jetting needs dialed in. Hard to believe that just 6 or so weeks ago it was a lowly rat rod.

IMG_1204.jpgIMG_1205.jpgIMG_1206.jpgIMG_1208.jpg
 

69ST

Well-Known Member
There are some big differences of opinion, between us, when it comes to bike aesthetics. And, the Yoshimura can usually makes a CT70 look like it's giving birth to a metal watermelon, grotesquely out-of-scale and it's a shame because the tri-oval has a nicely-rounded tone. That awfulness said, the way you blended the lines of the exhaust, with that beefy-profile G`Craft engine guard, nailed it...as in ten-point-zero on the aesthetic success meter, IMO. That's the kind of visual flow that OEM designers strive to achieve and the look has a decidedly OEM look. I don't even like low-mount exhausts on these bikes and I like this setup.

Bravo!:41:
 

fatcaaat

Well-Known Member
Thanks for the positive input. That tri-oval can was a smaller one I picked up about 6 years ago and I had been using it on another bike. You are correct, many times they look out of place, but this one seems about the right size IMO.

I think that the bars are too tall..I fabbed them about 2" taller than stock ones with a much wider stance. They are very comfortable, but I do think they are a bit too tall for my liking. I'll probably go ahead and make another pair and make them a little shorter with a little less bend so they sit forward a bit more. I bent 1" stock to form the lower and upper curve and then just inserted the handlebar end and the gripping end and welded. The welds were really nice on the top so I didn't even bother metal finishing those. One of the welds at the bottom was also perfect and did not require any metal finishing, but the other not so much. I ended up doing double passes and grinding them down.

I'm going to run the front end (stock) as is to see how bad it is on this bike. I have been strongly considering popping for a set of those daytona pogo-replacements to keep the actual look of the bike and improve the overall handling. If I do that, I will probably also update to a front disc.
 

fatcaaat

Well-Known Member
mre pics from today

I added braided stainless lines to it today, the reflectors, and worked on the jetting. Surprisingly stable at 50mph with that pogo front end on it. Brakes work really well, but the front end does dive bad when you grab the brake. I dressed the hub shoes and added brand new kitaco non-fade shoes...they do make a difference. I haven't run a pogo front end on anything other than a stock bike, so doing a 108cc is a new experience with it. Just waiting now for my upper frame emblem and a little more jetting to dial it in and it's done. I do have the matching chainguard done, and will potentially install that if I find a stock ct70 cover that I feel OK hacking on to make it fit. IMG_1211.jpgIMG_1212.jpgIMG_1213.jpgIMG_1214.jpgIMG_1215.jpgIMG_1216.jpgIMG_1217.jpg
 

fatcaaat

Well-Known Member
seems like a lot of fun so far, but I'm not quite right on the jetting. The pogo front end is not all that great either, truth be told to run on a fast bike. I am going to try and tame the front end by fabbing up a steering damper and mounting it vertical off the axle. I imagine that ought to tame the front end a bit and make it more stable at speed.

So, other than that little bit of work and finalizing the jetting, this puppy is done.
 

fatcaaat

Well-Known Member
So I added the vertical steering damper onto the pogo front end...and wow, what a difference! Other than the fact that you only get a mere 3 inches of travel on the front, the stabilizer turns the pogo stick into a fully dampened and rebounded experience. And it has 12 clicks of adjustment, so you can make it super stiff or very plush...it makes the pogo front end as nice or nicer than well-setup 1980-94 forks...no joke.

I sorted out the final jetting on it and took it out for 40 miles this morning. Runs, stops, and starts perfect through the whole range, except a slight gurgle around 45mph in top gear...I'll get that dialed in with needle and timing. Overall, this bike turned out much better than I had anticipated. I'd like to set it up for more power, but I'm torn between running this super smooth honda-based engine at 108 versus slapping in a torque monster. The bike is really refined everywhere else, it would seem a shame to remove the refined powerplant as well. I don't know how fast it will go, as it buries the speedo, but I would guess a top speed of 65mph is probably the limit. It loves 45-50mph which works out fine.
 

Attachments

  • IMG_1235.jpg
    IMG_1235.jpg
    71.9 KB · Views: 233
  • IMG_1236.jpg
    IMG_1236.jpg
    66.3 KB · Views: 204
Last edited:

fatcaaat

Well-Known Member
I rode the bike today another 50 miles to get the shakedown complete. Before I started, I installed this digital oil temp unit so I can see just how hot the motor will get. The sending unit is on the return side of the oil cooler so I can see how hot the oil is as it is returned back to the oil galley and through the filter (takegawa clutch). I am pleased to say that I was running this bike at 50mph for long stetches (that's 7300 rpm on this config) and I never saw a temp over 80c and it was 90 degrees today. That is pretty encouraging.

When I got back to the garage I parked it in front of the squirrel cage to see how fast the temp would drop...pretty fast. Anyway, this bike is very enjoyable. Not sure what else I'd want to do to it.
 

Attachments

  • IMG_1244.jpg
    IMG_1244.jpg
    45.6 KB · Views: 167

fatcaaat

Well-Known Member
Ride it �� Nice to be able to run at road speeds

The funny thing about this bike is that I did not set out to build a runner...I set out to build a show bike that stuck to original roots without too much dramatic flair, which is why I retained stock appearing seat, brakes, forks, headlight bucket, and handlebar styles and also retained honda dax/chaly looking fenders. Really, the engine, exhaust, crash guard, and rear sets are the only major deviations from stock.

I am actually very surprised at how much I like riding this bike. I figured the pogo suspension would be trash and the stock brakes not sufficient...I am pleased to report I am wrong on both of these. I also figured that I would be bored with the power, seeing that my other bikes are much more road capable and significantly more powerful. I am surprisingly not...this bike possesses just the right amount of power for evening jaunts and errands and 45mph cruising on backroads. It is not capable of doing full touring, but I'm not really interested in using it that way.

That said, I'm still thinking about other bolt-on bling/useful items that can continue to differentiate this bike. First, it needs mirrors so I'm going to need to make that purchase. Maybe one of those little windshields? Maybe one of those headlight eye-lids? Maybe a custom, extended rear rack that extends the seat line better into/over the tail light? Aestetics ya see.
 

fatcaaat

Well-Known Member
tach now?

So, I couldn't help myself. I added this here Tach. Pretty easy to hook up and seems to work really smooth and accurate. The tach is matching the projected speeds based on the gearing calculator. Happy with that.
 

Attachments

  • IMG_1303.jpg
    IMG_1303.jpg
    41.3 KB · Views: 225

kawahonda

Active Member
I'd like to know what all you did to install and create that steering damper. I think this could benefit anyone with the K0 forks. I could see that damper even living on a restored K0 that's sitting in a show!
 

fatcaaat

Well-Known Member
I'd like to know what all you did to install and create that steering damper. I think this could benefit anyone with the K0 forks. I could see that damper even living on a restored K0 that's sitting in a show!

It's just a clamp on the fork body and a little steel bent to serve as the anchor to the axle. Pretty simple really. I put some electrical tape under the clamp to the fork body as to not mess up the paint.
 

fatcaaat

Well-Known Member
I bought the same tach a few weeks ago. Can you provide connection details? I have no idea how to make it work
i believe there were 4 wires only. positive off the keyswitch, power to the light on light switch and the tach trigger. I think the tach trigger was put on against the yellow/black coil wire.
 

Deoodles

Well-Known Member
i believe there were 4 wires only. positive off the keyswitch, power to the light on light switch and the tach trigger. I think the tach trigger was put on against the yellow/black coil wire.
Thanks, the trigger was what I was unsure of and my fear. The most difficult wire to get my hands on.
 
Top