You are using an out of date browser. It may not display this or other websites correctly.
You should upgrade or use an alternative browser.
You should upgrade or use an alternative browser.
Compression question, yet another...
- Thread starter Kansas Corey
- Start date
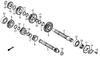
I counted 23T on #10 in that diagram. Yes, I know, very bad idea relying on these line drawings. Still, #9 is shown as being larger than #10 and that's hard to ignore. How about the PNs...23471-065-010 24T M/S gear; 23481-065-010 23T C/S gear; those are CT70H parts, BTW.
Where did you source that exploded drawing?
Where did you source that exploded drawing?
wanrep
Active Member
I counted 23T on #10 in that diagram. Yes, I know, very bad idea relying on these line drawings. Still, #9 is shown as being larger than #10 and that's hard to ignore. How about the PNs...23471-065-010 24T M/S gear; 23481-065-010 23T C/S gear; those are CT70H parts, BTW.
Where did you source that exploded drawing?
westernhonda.com
One of the few places on-line that has all the Honda fiche going back to 1959.
Your suspicions are correct. You are right. Honda is wrong.
I even dug out my microfiche that we used back in the day.
On the ATC70 fiche, they have the right part #'s for the gears but they are mislabeled as 23 & 24T instead of 24 & 23T.
Checked CT70H fiche and it's the same gears but labeled correctly as 24 & 23T.
Honda even used the misinformation to list the gear ratio in their manual as 1.04 instead of .958
You know your stuff racerx. Well done.
Thanks for being just as doggedly thorough. It must have appeared that I was just being a p.i.t.a. contrarian. This kind of thing is actually very typical with any kind of custom project. And, in this instance, it's the kind of seemingly minor detail that can have major, long-lasting, consequences. Road gearing means taking the final drive ratio right to the ragged edge of engine torque; trust me, it's worth getting it dialed-in. 3% is noticeable, especially when it's on the tall side. That's where one can go nuts trying to figure out why their engine is so "weak". Short gearing is less noticeable, for a while. Dropping 300-500rpm at cruising speed matters more as the miles roll on. These little engines sound and feel busy, even when everything (including gearing) is optimal. Now consider the longterm implications of an extra ~600 crank revolutions...per mile.
The real kicker, imho, is the fact that shorter gearing does nothing for acceleration above maybe 5mph. I used to take my daily rider to Mid-Ohio. The C/S sprocket was changed to a swap meet friendly 14t, from the road-friendly 17t cog. I could practically drop the clutch from an idle. Taking things a step further, I tried that for a trip to South Bass island, where 40mph is asking for a speeding ticket. Once moving, the bike pulled no differently than normal...it just felt like 4th gear was missing. Back on the open road, I can detect a 1t difference at the wheel...by the feel and sound of the engine. Seriously, I had to upsize by a single tooth when I went from Trailwings to road tires, due to the slightly larger rolling circumference. It's no different when offroading. The engineers really knew their stuff, when it came to overall gear spacing (ratios). When gearing is too tall, you'll invariably end up riding the clutch, to some degree...a dead giveaway. The only exceptions would be unusual circumstances. There is a little bit of gray area, to suit rider preferences. For example, staying 3-5% on the short side will allow better pulling power in top gear...or...going maybe 3% OTT may extend the usable range of 3rd gear (not an option with a 3-speed) enough to climb long grades, while using 4th like an "overdrive". The tradeoff is having to thrash the motor on some grades and a 4th gear that's only usable under close to ideal cruising conditions. Here, I'm talking about a bike with 60mph road power and the torque of at least 110cc. Below that power level, engine performance is sensitive enough that over-gearing nearly always turns out to be a liability.
I realize that the topic of gearing, for most, is dry as a popcorn fart. Still, getting it right makes a big difference. And, it only has to be done once.
Kansas Corey
Member
You guys are awesome! The knowledge just amazes me.
Now, can you help me drive this to a conclusion? Assuming time (and the wife) permits, by the end of this weekend, I plan on pulling the right crankcase cover to clean both the spinner and oil screen.
Once I have the right side open, are there gears that I need to specifically count teeth on like the Primary Gear (supposed to be 69T), the 4 x transmission gears, and/or mainshaft top gear (supposed to be 21T)? Sorry if terminology is rough, this is my first pass at this stuff and I'm working from parts diagrams for the part names. I'm honestly not even sure how much I can see from the right side with just the crankcase cover removed.
Just some additional FYI for the balance of the thread - - The oil that I'll be changing out will probably only have 5 miles or so on it, so I'll see if there are any metal flakes and, if so, test with a magnet to see if they're aluminum. I'm also going to check the cam chain tensioner (both automatic & manual), valve clearances, tear apart the carb to ensure the pilot jet & emulsion tubes are fully clean, and will verify that both intake & exhaust valves are nothing but clean metal.
It's a little tricky counting primary gear teeth, with the clutch in place. You'll find it easier if you can mark a gear tooth first, maybe a dab of a yellow paint marking pen. Tranny gears cannot be seen without splitting the cases. At that point, time to inspect the shift forks...which are likely nearing the ends of their service lives and are very easy to replace while the trans is on the bench.
Assuming you have the impact driver needed to open the oil spinner (by removing the throwout bearing flange), you may as well pull the flywheel & stator. With the stator assembly removed, you can see the timing chain, idler & tensioner up close & personal. BTW, you will need a flywheel removal tool. FYI, with the stator & RH clutch cover off the engine, any sludge can be douched-out using Brakleen.
Just take your time, work systematically/methodically, get the right tools (impact driver, flywheel removal tool, clutch nut spanner), ask questions before taking a chance of breaking something and you'll be fine. I usually say "the impossible just takes a little longer" but, truth be told, it only feels like that the first time through. All you're really doing is making your first pass through the learning curve, same as the rest of us did at some time in the past. And look how we turned out...
wanrep
Active Member
Thanks Kirby.
I had the part numbers jacked up. My bad.
23481-065-901 is a 24T.
The H model part # is 23481-065-010 which is a 23T.
So, yes...the 4th gear ratio IS 1.04 and Corey should figure out the sprocket combo using that figure.
Moral to the story....read the ENTIRE part number.
I'm going back to bed. My head hurts.
Last edited:
Thanks Kirby.
I had the part numbers jacked up. My bad.
23481-065-901 is a 24T.
The H model part # is 23481-065-010 which is a 23T.
So, yes...the 4th gear ratio IS 1.04 and Corey should figure out the sprocket combo using that figure.
Moral to the story....read the ENTIRE part number.
I'm going back to bed. My head hurts.
Oh yeah, the devil is in the details
 .
. Again, it's why I'll go to considerable lengths to verify tooth counts of unknown combos. That includes questioning virtually everything, until hard facts (in this case the ones provided by kirrbby) are in-hand. What you don't know can hurt you. And yes, to reiterate, the same basic mathematics are the only way to remove the guesswork.
FYI, lacking the correct parts list, one could sort things out by simply counting the gear teeth of the 4th gear pair & primary drive pair.
kirrbby
Well-Known Member
I have this transmission in my blue 88cc stroker Z50, and in my Black and Red/Recycled Cycle, but I think my primary gears are 18/67.
I knew it was a different trans than the H, but I wasn't sure how.
Seems like the taller gearing in 4th would work well for big displacement, and/or high revving motors. But maybe not so much, for stock 49-72cc engines, since it would lower the revs...maybe too much.
Sorry, I think I'm hijacking this thread now.
Last edited:
I have this transmission in my blue 88cc stroker Z50, and in my Black and Red/Recycled Cycle, but I think my primary gears are 18/67.
I knew it was a different trans than the H, but I wasn't sure how.
Seems like the taller gearing in 4th would work well for big displacement, and/or high revving motors. But maybe not so much, for stock 49-72cc engines, since it would lower the revs...maybe too much.
Sorry, I think I'm hijacking this thread now.
You're not hijacking the thread. As lengthy & convoluted as this discussion became, that's nothing compared to what it would have taken to correct the gearing had the gears not been positively ID'd. And, there's still the remote possibility that the installed 4th gear pair is 24/23 instead of 23/24. No, I'm not throwing sh*t against the wall. Anything is possible and you'd be surprised at some of the mixed & (sometimes mis) matched parts swap combos I've seen over the years...including hybrid primary gear pairs, which resulted in some bizarre noises.
As for the overall ratio spread, the ATC tranny is more close-ratio, which should favor a hp-biased tune (that makes relatively less torque). OTOH, gear spacing (of ratios) won't affect top speed...at all...as long as the chosen sprocket combo is matched to the overall primary + top gear + tire circumference. It wouldn't matter if this were a 3-speed; the only effect would be living with what feels like a 4-speed that's missing second gear.
Kansas Corey
Member
Good afternoon all! Bringing this thread back to the top with some additional information with my findings to date. First off, thanks again for all of the input and discussion.
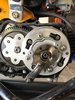
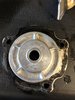
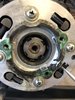
Now, when this thread started, I was concerned about my overall engine health and made the assumption that it might be compression. After multiple work sessions and thread updates/responses we ended up with several action items which I believe I've completed. The spinner was completely jam packed with junk and had 2 gaskets (one black one in pieces and one newer green one). Oil screen itself was spotless. I completely cleaned everything, scraped the gasket surfaces and installed new gaskets (both spinner cover and crankcase cover). Photos attached for reference showing the basics of the spinner cleaning.
I counted the primary gear at 69T and 17T on the smaller gear visible after the clutch is removed (sorry don't know the name).
Additionally, I completely tore the carb apart again and cleaned the snot out of it. The only real issue that I was this time was the push in pilot jet (not screw in type) was a bit dirty as I must have missed it previously. It did help with my idle though.
That was "phase 1" based on all of the previous conversations above.
Attachments

Last edited:
Kansas Corey
Member
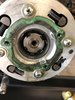
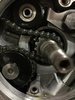
Okay - update for "phase 2" on this help me thread... This past Sunday I was able to pull the left side cover off and remove the flywheel. With the oil drained, I removed the stator assembly, but honestly don't know what I'm looking at. I understand the cam chain and the tensioner (hydraulic) but outside of identifying the basic pieces, I'm not sure what to check here to ensure that my cam chain isn't hitting the inside of the case and/or is adjusted correctly. Any input would be appreciated.
Attachments

Gary
Well-Known Member
Since your this far just pull the round cam cover off the left side of the cylinder head,the bolt head to remove it is on the spark plug side. Once that cover is off you can look in and see if the chain is so slack that it is dragging on the head making aluminum filings. It is possable the chain is stretched,mine was at around 2200 miles maybe due to PO? You can also replace the chain with out pulling the head.
Kansas Corey
Member
Gary - thanks for the input. Looks like a 6mm x 112 bolt (long sucker) on the parts diagrams. I'll pull it tonight and take a look.
wanrep
Active Member
The cam chain tensioner is spring loaded. There's a locking screw that holds it in place. It's right in front of the shift shaft on the left side.Okay - update for "phase 2" on this help me thread... This past Sunday I was able to pull the left side cover off and remove the flywheel. With the oil drained, I removed the stator assembly, but honestly don't know what I'm looking at. I understand the cam chain and the tensioner (hydraulic) but outside of identifying the basic pieces, I'm not sure what to check here to ensure that my cam chain isn't hitting the inside of the case and/or is adjusted correctly. Any input would be appreciated.
Loosen the lock nut then loosen the screw a turn. If the chain is loose, you'll be able to see that tensioner rod move a tad.
Not clear, at this time, which tensioner type this engine has...the manual or self-adjusting. If there's no lock stud/jam nut, it's the latter.The cam chain tensioner is spring loaded. There's a locking screw that holds it in place. It's right in front of the shift shaft on the left side.
Loosen the lock nut then loosen the screw a turn. If the chain is loose, you'll be able to see that tensioner rod move a tad.
From what I see in the pix, the sprockets in the cam drive assembly look pretty good. I'd replace the chain, roller, idler & tensioner piston cap, right now, as cheap peace-of-mind. Believe it or not, the oil spinner was cleaner than most I've run across and the double gaskets indicate that a P.O. actually cleaned it, at least once; that's rare(!).
OLD CT
Well-Known Member
It's actually best to pull the left side round cam cover to check the timing chain tension, You also have to remove the plug on the bottom of the engine on a 79, right next to the oil drain plug. A little oil will drip out and then stop. The adjuster is under the plunger plug I am trying to describe. The side has the locker for the tensioner. Once you have the locknut/side screw loose you turn the adjuster ''on the bottom'' in slowly clockwise to tighten it. Then tighten the side screw/lock nut on the side back up. It can be adjusted while the engine is running too, you keep the cam cover on for that one though! lol.
With the engine assembled and in the bike yes, pulling the cam cover is the best, not to mention only, way to see the timing chain. With the stator assembly removed, you have the best way to directly check chain tension.
FYI, back in the day the method for resetting chain tension was to turn the spring preload adjusting screw clockwise, engine running, until the noise goes away. IMHO, workable but crude. If the chain can contact the cylinder tunnel, then it's all but certain that there's enough wear in the cam drive assembly to warrant replacing a few parts. With all-new parts in the cam drive assembly, typically, initial chain tension is beyond tight...a bit unnerving until one has done a few rebuilds.
FYI, back in the day the method for resetting chain tension was to turn the spring preload adjusting screw clockwise, engine running, until the noise goes away. IMHO, workable but crude. If the chain can contact the cylinder tunnel, then it's all but certain that there's enough wear in the cam drive assembly to warrant replacing a few parts. With all-new parts in the cam drive assembly, typically, initial chain tension is beyond tight...a bit unnerving until one has done a few rebuilds.