1973 CT70 Project "Rude Boy"

TheGarBrah

Member
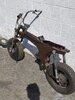
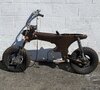
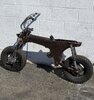
Hello Everyone allow me to introduce my latest project affectionately named the "Rude Boy" . The color is prismatic powder Rootbeer Brown , with matte black powdercoating on the wheels. The hardware and rear shocks are original and have been polished by hand . The bike has been sitting in storage for 6 months and is not quite clean but this has been a frame up rebuild and has had all hardware and frame + engine sandblasted.

Will be getting a new seat cover for the bike and probably new foam as well, and also brand new cables and handlebar grips. I'll be throwing on an aftermarket head light (maybe LED ? ) along with decals. New switch, wiring , battery and coil are all going into the bike.

Currently I thought I was having issues with the coil not getting a good enough ground from the frame, but after shaving down the contact area and still not getting spark and putting another running engine on this frame to verify, it seems the original engine is having issues either with the points or something with the stator coil.

I had semi taken over another thread asking about questions so I decided it was appropriate to start my own build thread .
 

Attachments

  • 20210319_150001.jpg
    20210319_150001.jpg
    1.7 MB · Views: 174
  • 20210319_145826.jpg
    20210319_145826.jpg
    1.2 MB · Views: 170
  • 20210319_145953.jpg
    20210319_145953.jpg
    1.4 MB · Views: 158
  • 20210319_150007.jpg
    20210319_150007.jpg
    2.1 MB · Views: 145

OLD CT

Well-Known Member
How many cc's are you planning on running with the pogo front end? I personally wouldn't run more than 88ccs.
It is WAY to wonky and dangerous! A 72 K1 and up front end would be the hot ticket.
LED headlight in 12 volt, I hope. Anything in 6 volt will be a disappointment. Sounds like you are going China clone engine?
 

OLD CT

Well-Known Member
Not trying to hijack your thread but here is a performance tuned '' better springs'' 72 front end with 15w fork oil front end that will out perform a not so fancy 400 dollar inverted china front end.
I am very comfortable bringing the bike up to 70mph as pictured...

IMG_0918.jpg
 

TheGarBrah

Member
Thanks for the suggestion OLDCT, I think for time being I'll stick with the oem front end and not mess with the engine on this particular bike too much. I do have another CT70 that I might spruce up a bit, but since this is my first CT70 build I'd like to see how it feel stock . I plan on taking this out to the local trails and getting it dirty and from there figure out how I want to further build it.

I've been stashing enough parts for a mutant type bike and I like the idea of the Honda Nice engine, or throwing something slightly larger in but I'll wait and see .
 

OLD CT

Well-Known Member
That's good news! The one thing is all the 6v led headlight bulbs are worse than a standard 15w/15w bulb.
The best thing to get good lighting would be buy the CDI conversion kit '' nice lighting upgrade'' and change the headlight bulb to a 25w/25w bulb. You will be able to cruise at night. I like the root beer color. Nice choice, it should pop in the sun!
 

TheGarBrah

Member
So this may seem like a dumb question but I'm struggling a bit with the motor on this bike. I've got no spark on two of my motors and spark on a third however none of the points seem to be opening on the any of the bikes at the correct timing marks. So before I do a timing light test I'm wondering how its possible that all three engine could be off on the timing . Is there something I'm missing ?
 

OLD CT

Well-Known Member
It's not a dumb question, we need to see pics of the 2 stators and the inside of the 2 flywheels in question.
 

kirrbby

Well-Known Member
In case you don't know...you can check spark on your engines, without putting them into the frame. Just need to ground a ignition coil to the engine case, then connect the black from the stator to the small black from the coil...then kick over or spin the engine. It's also much easier to clean and set the points while it's on the bench.
If you don't have a flywheel puller yet, get one...for sure.
 

TheGarBrah

Member
I'll definitely be checking the spark that way from now on Kirrbby! I've attached a couple photos of the engine flywheel and stator coil. Everything seems to be in ok shape but I'm wondering which part actually touches the points assembly and pushes it open? If you guys see something Im missing Id like to know bc this problem has been nothing but a PITA
 

Attachments

  • 20210329_152435[1].jpg
    20210329_152435[1].jpg
    1.1 MB · Views: 89
  • 20210329_152445[1].jpg
    20210329_152445[1].jpg
    1.1 MB · Views: 97
  • 20210329_152514[1].jpg
    20210329_152514[1].jpg
    857.8 KB · Views: 92
  • 20210329_152542[1].jpg
    20210329_152542[1].jpg
    1.1 MB · Views: 99

Robert thran

Well-Known Member
The center of the flywheel has a high spot that opens the points. the fiber part on the points touch the flywheel and that’s how the points get opened an closed.. the points could be old an warn down to the point where adjusted all the way open an still wouldn’t open them? I’ve also seen the flywheel warn down to the point where there’s no longer a high spot but have only seen that happen only once so it’s a long shot..if you look real close you should be able to see that..I would try new points and condenser..also that black wire needs to go under your light coil so it doesn’t rub on your flywheel..if it gets a bare spot and touch’s anything it will short and you will hv no spark..
 

Robert thran

Well-Known Member
P.s. those points look rough!! Your also missing the side insulator on you primary coil..look right below your points. That may or may not cause a problem????
 

TheGarBrah

Member
Well Gang, I replaced the points and did some light sanding on the contacts and got myself a spark ! Woohoo. I think the timing might need some fixing because I get the points to open about midway between F and T and the points close past the T mark. I'll do some more research on this before I go about setting the timing. But this is real progress and I'm grateful for the help . Gonna put some work in on the little bike this week and maybe even get it running by this weekend. I ordered new grips, cables, and will start getting all the goodies on it.

I've also got a C70 that is about 95% done and just needs a new seat cover and some fine tuning to get all the lights working. Its going to be a bitchin summer
 

TheGarBrah

Member
So after several months on the backburner and several attempts at trying to trouble shoot the issue I decided to just go ahead and replace the condenser and begin replacing things until the problem finally goes away.

Low and behold while fiddling with the condenser I noticed that the wire running to the points contact had manage to break at some point and the cover over the wire had managed to hide that issue. So after analyzing the situation and the surprisingly poor design of using such thin coil wires I decided to do a bit of upgrading to further prevent any issues like the one I had .

Starting with the points wire I upgraded to a much heavier gauge and more flexible wire. I also put in a new condenser , along with a nice new piece of felt . I also soldered a thick brass wire to the second second coil wire and allowed the wire to not be so exposed to breakage .

Annnndddd VOILA ! the bike sparked right up with a crisp blue spark. Next is to get this engine running and get the bike all tuned up.

Even thought the paint and wheels are looking good, and I've got new wiring, iginition, and batteries the original handlebars, rear taillight housing, and front wiring are looking a bit beat . I'll have to start upgrades on those areas soon
 

Attachments

  • 20210714_205022.jpg
    20210714_205022.jpg
    1.5 MB · Views: 68
  • 20210714_205030.jpg
    20210714_205030.jpg
    988 KB · Views: 68
  • 20210714_205049.jpg
    20210714_205049.jpg
    851.3 KB · Views: 74
  • 20210714_205102.jpg
    20210714_205102.jpg
    1 MB · Views: 72
  • 20210714_205441.jpg
    20210714_205441.jpg
    1.5 MB · Views: 83
  • 20210714_205444.jpg
    20210714_205444.jpg
    1.5 MB · Views: 81
  • 20210714_210725.jpg
    20210714_210725.jpg
    1.3 MB · Views: 78

Robert thran

Well-Known Member
Just make sure that fatter wire doesn’t touch or rub any part or the rotating flywheel. If it touches it will rub through and ground out points..Sometimes it’s real tight with even the stock gauge wire insulation.
 

TheGarBrah

Member
Just make sure that fatter wire doesn’t touch or rub any part or the rotating flywheel. If it touches it will rub through and ground out points..Sometimes it’s real tight with even the stock gauge wire insulation.

I definitely made sure to tuck all the wires and purposely made it so that I can hide them from every being exposed. This was also the problem before and part of the reason why I couldn't figure out the spark issue . The wire had been exposed and I could see it sparking. One of the pictures should show how I hid the wires .

In any case , I am avoiding any kind of wire ground at all cost
 

TheGarBrah

Member
Hi everyone, I managed to put some time back into the project and finally got it running ! Its definitely idling a bit rough and I'm guessing its going to need some carb tuning. But it FINALLY runs.

One questions Ive got is regarding the sprocket and drive gear for the bike . The engine serial number is CT70E-201272 . So I believe this is a K1 bike which should have a 15/35 T ratio . But the bike came with a 38 tooth sprocket... So my question is which is the correct size for this engine ? I might try and run the original 38 tooth to see how it performs but the sprocket is shot and there is no way it will be any good for future use.
 

OLD CT

Well-Known Member
K1 auto 15-35. Pretty sure a K0 auto is a 38 rear. If you have a neutral switch above the sprocket it is a K1. No switch is a K0.
 

TheGarBrah

Member
Thanks Old CT , Im not sure what you mean by neutral switch near the sprocket . Is it something located on the left crankcase near the drive sprocket ? I've never heard of anything like that before .
 
Top