84 CT110 - Bringing It Back From the Dead

b52bombardier1

Well-Known Member
Hello,

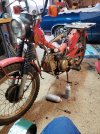
I have not started a build thread for a while but here we go. A buddy of mine dragged home a deer camp " haul the dead deer out" 1984 Monza Red (I think) CT 110 barn find bike and wants me to get it running - I've never done a Honda bike so new so IDK . Ran from 1984 until 1994 but nothing since then - about 830 miles on the odometer. Cosmetically awful, dirty, rusty chrome wheels, missing the battery side cover, seat foam and cover falling apart, no rear brake light or tail light assembly. Really bad rusty fuel tank. But has 140 PSI of compression and at least a weak spark out of the CDI ignition module. And two ignition keys, an owners manual, the 1984 Safety Inspection sticker and a clear Texas title. No tool kit.

If anybody has been missing their Bambi pet deer from near Austin, Texas during the 1984 to 94 time frame, I can probably still find a blood sample for you suitable for DNA testing off the luggage rack. Might be blood mixed in with other deer, the occasional pig, etc. so good luck.

Pictures in a few days.

Rick
 

Tripod

Well-Known Member
Sweet a build thread. The ct110s out here really seem to hold their value. Pretty jealous of the cdi. When i had my ct90, it seemed like dratv had plenty of oem 110 parts.
 

b52bombardier1

Well-Known Member
Hello,

A new battery and getting the choke fully open to allow some carb cleaner all the way up and shot into the manifold allows this motor to start and accelerate well for ten seconds or so. A fresh spark plug and tightening the high tension lead at the spark plug also might have something to do with it. No detectable smoke from the tail pipe and no oddball sounds from the motor.

I'm debating whether to immediately buy a Dr ATV / EBay new carburetor or take this one apart and see how bad it is. I'll probably take it apart because either way, its coming off. I'm DEFINITELY buying a POR-15 Motorcycle Fuel Tank Cleaning & Liner kit for that fuel tank tonight.

With good metal prep inside the tank and getting rid of every drop of the cleaning water and etching phosphoric acid fluid inside the tank afterwards before pouring in the urethane . . . I've had excellent results with the POR-15 kits.

Yes, I still owe LiL' Honda a few pictures for this one.

Rick
 

joel1234567

Active Member
I've started covering the outside of my por15'd tanks with blue painters tape prior to applying the full process. I'd either get a leaked glob of 40 year old gas taffy that stains the paint or a splashing of acid that eats through the paint. Maybe I'm just messy.
 

b52bombardier1

Well-Known Member
I've got a few old tank caps that I use while I'm sloshing the Marine Clean, the phosphoric etching acid and the urethane around. And I loop a piece of old fuel line between the main and reserve lines of the fuel tank drain ports while this process is underway. I've never seen any of this eat through this rather durable lacquer paint but I have seen the paint on the top of the tank discolor a little. You must be very careful not to leave the tank cap on or the the drain lines full of urethane . . . . trouble will befall you unless you have a collection of paperweights.

I get the Marine Clean and the phosphoric acid baths up to a near boiling temperature before pouring it in with a lot of nuts, bolts, washers, scuba weights and aircraft carrier anchor chain links. Just kidding on the scuba and aircraft carrier stuff but everything else contributes to getting the rust out and preparing the metal for the urethane liner.

Rick
 

b52bombardier1

Well-Known Member
Hello,

My Dr ATV carb rebuild kit came in yesterday and I reassembled the carb late this afternoon. I can't get fuel past either the old float needle or the new float needle but the on / reserve valve is fully functional. The bore in the carb body that holds these needles seems to be a little too grippy and grabby with the needles. And I'm not sure how to fix that other than buy a new carb. Maybe I can hand spin a drill bit inside the bore just a little and see what happens.

Rick
 

dirtbkr188

Active Member
I suggest that you try rolling up a piece of fine sandpaper into a tube almost as big around as the size of the hole in the seat. insert it into the hole and twist it by hand, cleaning and testing the needle to see if it moves freely. Repeat if necessary. And then make sure it is thoroughly clean before you try to use it.
 

b52bombardier1

Well-Known Member
Hello Nate,

Yes, a single picture for now, more later after I get it running better and cleaned up. Its at least a complete bike (minus the tail light bracket but I have a spare) with no rusty holes in the exhaust pipe. The decal on the air cleaner box is ripped but this can be replaced. The chrome on the wheels also has surface rust that should clean up with a damp, soapy SOS steel wool pad. And the brakes are still good. Whether the stator works to make electrical power is the last big mystery for me here.

I'm still waiting on the new carb to arrive. UPS had a delayed truck and then they handed the box off to the US Post Office and tracking says its around here locally somewhere but it can't get here until at least Tuesday with the federal holiday tomorrow. This is not a copy of the original Keihin carb and this Chinese carb is shorter from the front to the back which won't immediately be able to reach the rubber air cleaner connection. They want $350 for an original, new Keihin carb for a CT110 and I could never ask my buddy to reimburse me for a cost such as that.

But. But!! I can either make myself a thicker carb spacer for the Chinese carb between the manifold and the carb inlet suitably carved out of hockey puck rubber or get my oldest son to 3D print a spacer for me out of heat and fuel resistant filament. My son has done this for me before on an ST90 and his STL file for the printer works perfectly. One way or another, this Chinese CT110 carb will reach the rubber air cleaner bellows and the bike will live again.

She is a dirty bike that needs a bath with new seat foam and cover. And my POR-15 kit is here to clean up that fuel tank. In the finest traditions of Louisiana red neck technology, the rusty fuel tank will be internally cleaned up while duct taped to the jacked up rear wheel of a Honda four wheeler. In will go the hot Marine Clean fluid with a lot of nuts, bolts and washers and I will set it to slowly tumble this assortment of chunks and hot detergents. A blowing fan set doing its thing onto the four wheeler motor is definitely required for engine cooling. Ear plugs are also recommended or simply walk away from the noisy tumbling of the the nuts, bolts and washers. This cleaning step is by far the hardest part of doing the POR-15 treatment. The phosphoric acid etching step is simply better living through chemistry. Getting all of the etching acid fluid out is the second hardest step - a 1000 watt heat gun is required or it'll quickly flash rust. Pouring the urethane in, around, upside down, etc to get a good coat and then mostly poured out through the reserve tank drain tube is easy.

Two days to let the urethane cure and its done. I will start all of this as soon as the carb is in and running well.

Rick
 

Attachments

  • 20230107_172142.jpg
    20230107_172142.jpg
    2.5 MB · Views: 38
Last edited:

hambone

Active Member
I like the step-thru trail bikes, I have a nice 86 CT110, it just sits in the corner with the others, need to get it out and ride a little.
photo (72).JPG
 

-Nate

Active Member
That looks like a pretty good bike to me .

I'm now using steel BB's to help scrape the rust off the inner tank with the Phosphoric Acid mix .

If you're getting flash rusting the liquid is too diluted .

Using stell wool on chrome will cause the rust to come back worse the same amount of labor is required to do it correctly using rags and proper chrome polish .

Nice trio Hambone ! .
 

b52bombardier1

Well-Known Member
I heat up the undiluted phosphoric acid straight out of the container to near boiling for the iron phosphate etching step - no extra water at all. This is where I'm at with this tank right now because I decided to get started with it a few hours ago. No duct tape this time, I had enough bungee cords to adequately affix the tank to the wheel.

The nuts, bolts and washers tumbled at low RPM for nearly an hour to remove the loose rust and fuel varnish. I think the tank metal likes to flash rust here in Louisiana because of the high humidity.

Its funny but this same hot weather high humidity is what makes my clothes shrink a little every year - and right at my waist line. At least, well, uhhh, ummm, that's the only plausible explanation I can come up with.

Rick
 

Attachments

  • 20230115_124721.jpg
    20230115_124721.jpg
    3.4 MB · Views: 31

b52bombardier1

Well-Known Member
Hello,

The new carb showed up today and the bike runs and idles nicely. All four gears seem to work OK but I'm not riding it because the fuel tank and seat are removed. The urethane from the POR-15 fuel tank sealant kit went in a few hours ago and it takes two days or so for the sealant to cure.

Unlike my other six volt bikes that produce 7.0-7.5 volts DC when running, this bike presently only shows 6.06 volts at the battery at an RPM well above idle. This will require further investigation. The headlight is also dead, no operating turn signals and no brake light assembly or rear turn signals at all at this point. The Reagan era original tires also are big time dry rotted. Lotsa' work remains for this bike but I'm getting there.

Rick
 

-Nate

Active Member
Find the correct wiring diagram as your '84 is different from most .

IIRC it only has a half wave rectifier .

The headlight runs directly off the alternator, fix the charging system first as it will blow the $$ ! headlight bulbs .

Time for slow and careful works, unplug the MPC leading to the alternator, it's often corroded and green .
 

b52bombardier1

Well-Known Member
Hello,

The POR-15'd fuel tank and the still ratty seat went back on today. She moves under her own power through all gears, high and low range - made it up to 30 MPH on the speedometer today. Idles very nicely and accelerates easily but I initially had the main and reserve fuel lines swapped at the carb fuel valve . Horn works. The only turn signals I have (on the front) illuminate but don't flash - bad flasher relay probably. The stator wires put out decent 10-15 volts AC power but still no DC power anywhere other than whats in the battery - I'm thinking dead rectifier but I need to do more multimeter work. No power at all at the tail light wiring and no power at all at the headlight connector. And I'm shocked the badly dry rotted back tire withstood today's riding.

I've got some work ahead of me for electrical things.

Rick
 

b52bombardier1

Well-Known Member
With the engine running, I've got AC power on both input connections at the rectifier and nothing out from the rectifier for DC. I'm going to clean up the mounting base of the rectifier to see if it has lost its ground but I predict that this rectifier is likely dead.

I've got an inexpensive Onsemi GBPC3504 rectifier here from DigiKey that I think I can mount up and make work electrically and mechanically. Its a 35 amp, 400 volts peak inverse device that should be bulletproof but I think I will have to run an all new ground wire to it. The bike frame will be the heat sink.

Rick
 

-Nate

Active Member
That's it ~ you'll only need to add one ground wire, to the rectifier proper .

Heat sinking it is a good idea too, use old aluminum cans or whatever .


DigiKey is the way to go .
 

b52bombardier1

Well-Known Member
Hello Nate,

I removed the mounting bolt from the rectifier earlier this evening to start looking at it and the wire with the B+ tab was broken - the actual B+ tab fell away from the rectifier body. No fixing that rectifier, obviously. I need to add new connectors to the wires tomorrow evening and see what happens with an all new, heavy duty rectifier.

Rick
 
Top