You are using an out of date browser. It may not display this or other websites correctly.
You should upgrade or use an alternative browser.
You should upgrade or use an alternative browser.
K0 out of a pile
- Thread starter Chrisj796
- Start date
-
- Tags
- freebie k0
mark from florida
Active Member
looks good
Chrisj796
Member
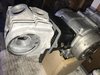
I was going to use the blast cabinet with glass beads that I did everything else with to clean the cylinder head. After running it by a few people I am not so sure about it now. I have some mineral spirits I can soak it in.
I was planing on just buying a new top end but after looking at the price difference between OEM an aftermarket I’m guessing the original parts will be worth repairing rather than replacing with cheap aftermarket.
The last few vehicles engine I rebuilt I got hot tanked does anyone have any home remedy’s that have worked well for them?
The cylinder head is the odd duck of engine parts, when it comes to cleaning.
Hot tank soaking goes a long way toward loosening, if not removing, most of the dirt & carbon. A thorough soak followed by crushed walnut shell blasting may do what you want, quickly. It won't change the as-cast surfaces of the fins (sandcast texture) or the combustion chamber + valve heads (low gloss, if not oxidized).
It's when you're dealing with heavy carbon/rust in the combustion chamber or heavy oxidation/staining of the sandcast fin surfaces. The combustion chamber can be cleaned using glass bead...paired with low pressure, increased gun distance and working quickly. The ports can be heavily blasted with glass bead and normal gun pressure, working from the outsides of the ports. The valves must be left in place to protect the guides & valve seats (even if the need to be cut).
Aluminum prep, sold through automotive paint suppliers, Eastwood Tool, et al, or oven cleaner containing sodium hydroxide will usually do the job, without profiling the surfaces. A nylon bristle brush is used for the scrubbing, followed by immediate rinsing.
If that doesn't clean the staining from the outside surfaces, then the choices are living with the results...or media blasting. Unlike any other engine part, including the head covers & cases, wet blasting can deliver a result that is reasonably close to original. That sandcast texture is quite compatible with wet media blasting. Dry blasting with glass beads can deliver an okay result...if you work quickly (minimal blast time) and carefully (very low pressure) but it's not as nice, or as close to original, as wet blasting for this item.
Chrisj796
Member
Thanks I have them sitting a bucket of carb cleaner, will give it a few days see how it’s working.The cylinder head is the odd duck of engine parts, when it comes to cleaning.
Hot tank soaking goes a long way toward loosening, if not removing, most of the dirt & carbon. A thorough soak followed by crushed walnut shell blasting may do what you want, quickly. It won't change the as-cast surfaces of the fins (sandcast texture) or the combustion chamber + valve heads (low gloss, if not oxidized).
It's when you're dealing with heavy carbon/rust in the combustion chamber or heavy oxidation/staining of the sandcast fin surfaces. The combustion chamber can be cleaned using glass bead...paired with low pressure, increased gun distance and working quickly. The ports can be heavily blasted with glass bead and normal gun pressure, working from the outsides of the ports. The valves must be left in place to protect the guides & valve seats (even if the need to be cut).
Aluminum prep, sold through automotive paint suppliers, Eastwood Tool, et al, or oven cleaner containing sodium hydroxide will usually do the job, without profiling the surfaces. A nylon bristle brush is used for the scrubbing, followed by immediate rinsing.
If that doesn't clean the staining from the outside surfaces, then the choices are living with the results...or media blasting. Unlike any other engine part, including the head covers & cases, wet blasting can deliver a result that is reasonably close to original. That sandcast texture is quite compatible with wet media blasting. Dry blasting with glass beads can deliver an okay result...if you work quickly (minimal blast time) and carefully (very low pressure) but it's not as nice, or as close to original, as wet blasting for this item.
Looks like an original seat pan, with the early stages of metal failure. See those puckered sections of the side rails? That's the Achilles Heel of these. You really should straighten, then bead blast, the metal...see what you're starting with. Finding one of these early pans without any cracking is uncommon. Any breaks, no matter how small, will doom your seat restoration to early failure. The metal is thin, structural strength comes from the shape of the pan and it must be intact. Otherwise, the pan will have the structural rigidity of rubber; the rear section will soon collapse onto the TL bracket. The good news is that it is possible to weld the breaks, add an angle brace to each side and prevent a repeat performance...while retaining all of the original stamping detail. Not much in the way of material resources are needed to do this and do it right.
FYI, Honda added angle reinforcements to the seat pans beginning with the K2 model. They also went to a synthetic foam, with a much longer lifespan. Unfortunately, the K0 & K1 seat foam each have a shape unique to their specific model. K0 reproduction molded foam is available from a few different vendors. Best to source the new foam & cover from the same vendor.
FYI, Honda added angle reinforcements to the seat pans beginning with the K2 model. They also went to a synthetic foam, with a much longer lifespan. Unfortunately, the K0 & K1 seat foam each have a shape unique to their specific model. K0 reproduction molded foam is available from a few different vendors. Best to source the new foam & cover from the same vendor.
Chrisj796
Member
Looks like an original seat pan, with the early stages of metal failure. See those puckered sections of the side rails? That's the Achilles Heel of these. You really should straighten, then bead blast, the metal...see what you're starting with. Finding one of these early pans without any cracking is uncommon. Any breaks, no matter how small, will doom your seat restoration to early failure. The metal is thin, structural strength comes from the shape of the pan and it must be intact. Otherwise, the pan will have the structural rigidity of rubber; the rear section will soon collapse onto the TL bracket. The good news is that it is possible to weld the breaks, add an angle brace to each side and prevent a repeat performance...while retaining all of the original stamping detail. Not much in the way of material resources are needed to do this and do it right.
FYI, Honda added angle reinforcements to the seat pans beginning with the K2 model. They also went to a synthetic foam, with a much longer lifespan. Unfortunately, the K0 & K1 seat foam each have a shape unique to their specific model. K0 reproduction molded foam is available from a few different vendors. Best to source the new foam & cover from the same vendor.
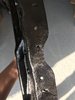
it does have a small crack on both cut outs for shocks, looks like they stamped one of the tabs right on the lip which make it weak. does anyone have a photo of a nice one? I will have a welder take a wire feed to it an knock the humps out of the rear of it.
Attachments


Chrisj796
Member
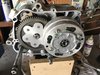
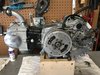
Lapped valves today, everything is looking good. Welder got finished with my seat pan and I am drop off parts next week for paint. Also does anyone know of you can paint the cylinder head or just leave it raw aluminum, I got my clean but it doesn’t look as uniform as some I have seen on the internet. I am curious if they are painted or using some sort of resurfacing on them?
Attachments
Last edited:
Chrisj796
Member
Ok thanks, the cabinet I use has sand or glass media, I guess I will just take a stiffer bristle brush to it.None are painted. To get it to look as new, vapor blasting/soda blasting is the way to go
Chrisj796
Member
Ok I have tried a few different things on it an just can’t seem to cut the oxidation between fins without damaging the surface. Why is the 16 tooth not good?Neverdull works great Chris, try it... It looks REAL GOOD, if there isn't built up grease which obviously yours does not have. 16T is not a good choice for 72ccs or even 88ccs.
Chrisj796
Member
Oh thanks, I figured one more tooth would give it a little more top end, guess I will have to get a 15 tooth.It will not rev out 3rd gear or hit normal top speed.
Chrisj796
Member
Hey everyone, I was tinkering with engine today spinning it around by hand listening to valves and noticed I cannot spin it backwards. Will go about one turn then locks up, I cannot spin sprocket either. Spin it forward an it works great an sprocket spins freely. Is this normal or is something not assembled right in transmission?