My K3 Resurrection

adzrules

Active Member
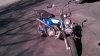
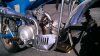
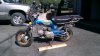
After purchasing this K3 over a year ago and then having to let projects go by the wayside for a while, I am finally ready to start in on this project.

What I know already:
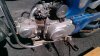
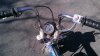
- Good compression (though I haven't actually put my tester on to see the reading yet)
- Shifts gears well (at least when it's not running)
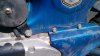
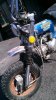
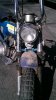
- Wiring needs work (threw in an AGM battery I had and only got the brake light to work - I had to redo the battery connections before that even would work)
- Kicks over well but wouldn't start with a bit of fresh gas and a fresh battery, but I wasn't expecting to be that lucky without some work
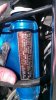
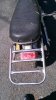
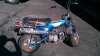
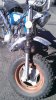
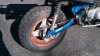
- A bit of rust removal in the tank and on the wheels (I am not looking forward to getting the wheels apart when that time comes:shocked:)
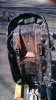
- I have the classic rusted seat pan that looks like someone filled it with buckshot from below.
- Some other wacky cosmetic things like the bent kickstand or the weird weld on the rack for strength (not sure the PO succeeded there :40:)

Plans to begin with (not in any particular order):
- Plug, points, timing, etc.
- Clean carb
- Check airbox for any inhabitants throughout the years - I'm guessing the filter itself is probably crunchy from what I have seen already.
- Clean oil filters and put in fresh oil
- Clean fuel tank, replace fuel lines and filters
- Clean/repair all wiring connections and reroute those that have wandered from their rightful home...

I figure on tackling the motor/fuel system first would be best and if I have to mess with the wiring along the way that isn't overly difficult. This should be fun.
 

Attachments

  • IMAG0145.jpg
    IMAG0145.jpg
    45.3 KB · Views: 197
  • IMAG0142.jpg
    IMAG0142.jpg
    122.2 KB · Views: 195
  • IMAG0123.jpg
    IMAG0123.jpg
    40.4 KB · Views: 216
  • IMAG0124.jpg
    IMAG0124.jpg
    48.6 KB · Views: 168
  • IMAG0139.jpg
    IMAG0139.jpg
    48.1 KB · Views: 179
  • IMAG0133.jpg
    IMAG0133.jpg
    50.6 KB · Views: 178
  • IMAG0131.jpg
    IMAG0131.jpg
    148.9 KB · Views: 200
  • IMAG0128.jpg
    IMAG0128.jpg
    49.3 KB · Views: 172
  • IMAG0127.jpg
    IMAG0127.jpg
    167.7 KB · Views: 172
  • IMAG0122.jpg
    IMAG0122.jpg
    48.7 KB · Views: 203
  • IMAG0135.jpg
    IMAG0135.jpg
    44.8 KB · Views: 207
  • IMAG0140.jpg
    IMAG0140.jpg
    165.7 KB · Views: 193
  • IMAG0125.jpg
    IMAG0125.jpg
    159.4 KB · Views: 154
  • IMAG0136.jpg
    IMAG0136.jpg
    51.7 KB · Views: 175
  • IMAG0143.jpg
    IMAG0143.jpg
    127.4 KB · Views: 167

hornetgod

Well-Known Member
The headlight only works when the engine is running and the key switch is in the lights position. I'm currently restoring a K3 myself.
 

Adam-NLV

Well-Known Member
Cool K3. I have a K3 CRB project bike, have been storing away parts.

I don't have my bike's original engine but my frame number is CT70-2301928 5/73.
Was wondering what your bikes Eng number is.
 
Last edited:

adzrules

Active Member
Was wondering what your bikes Eng number is.

It's CT70E-2312112. Looks like it's 212 apart from my frame number (CT70-2311900). Your frame is about 5 months before mine (mine's from 10/73), so they pumped quite a few of these out in the interim.
 

adzrules

Active Member
I had forgotten about how the headlight works on these. It's a little different than my CT90, where I can run the headlight when the engine is off.
 
Last edited:

abuck280

Member
As far as getting the tires off the rims..........save yourself a headache and take them to a loacal garage and pay 5$ or $10 to have them do it on thier machine.
 

hornetgod

Well-Known Member
It's CT70E-2312112. Looks like it's 212 apart from my frame number (CT70-2311900). Your frame is about 5 months before mine (mine's from 10/73), so they pumped quite a few of these out in the interim.

Honda made a total of 32,907 K3's between May of 1973 and June of 1974.
 

adzrules

Active Member
An Update...

So I got a little work in on my project today and had a couple of questions.

I opened up the airbox and was happy not to have found any evidence of critters living in there. Everything was decently clean. All there was to the air filter was a green piece of spongy material, which I am not exactly sure that's OEM (see pic). I imagine with rubber that's almost 40 years old that I would be smart to replace the rubber fittings in and out of the airbox?

I put in a sealed 6V 4.5 Ah battery just to test the wiring. I got the tail light to work as I previously described. After leaving the battery connected to the harness for about 10 - 15 minutes (the ignition switch was turned off), I was going to test some wiring when I noticed the rectifier was uncomfortably warm to the touch, as were a few other wires. Needless to say, I pulled the battery. Any thoughts as to why this might have happened? I am assuming I have a short somewhere or I have a broken wire.

After the hot rectifier incident, I pulled the fuel tank and the wiring harness and the harness didn't look too bad - the outer sleeve was nice and crunchy, as one might expect. I went and tested for continuity and didn't notice any wires that weren't responding as they should. I have another K3 harness that I know is good and was going to put that in as a replacement.

After that I took on the handlebar switches. The LH switch had the turn signal handle broken off (which really doesn't matter since I don't have signals attached :3:), and the return spring on the horn button had been lost sometime in the past. I pulled the wires and opened up the switch and cleaned or replaced some parts with better pieces that I had from an eBay lot. Replaced the rotten sheathing with electrical tape for now - I'm not looking for stock, just functionality. Didn't quite make it to the RH/kill switch, but that should happen this week.
 

Attachments

  • IMAG0147.jpg
    IMAG0147.jpg
    40.5 KB · Views: 158

adzrules

Active Member
Thanks, hornetgod. I couldn't tell from the poor picture quality I have in my shop manual.

As for today, I pieced together a functioning kill switch housing (boy is it a :censored: to get that Hi/Lo switch spring and plate back in it's rightful place!). As with most of the other sheathing, the leftover gray sheathing on these wires was extra crispy. Nothing a bit of electrical tape wouldn't replace.

Tested the horn today and it talked back to me a bit. It will probably sound better when the wiring is connected properly and I adjust that screw on the back. If need be, I'll do the hard impact treatment to loosen the diaphragm.

I should have taken pics of the inner workings of each switch as I went for others to reference, but forgot.
 

hornetgod

Well-Known Member
I have rebuilt a couple of those switches myself and agree that they can be difficult. I have used gray heat shrink with great success.
 
Last edited by a moderator:

adzrules

Active Member
Today I went through and cleaned all the connections in the new-to-this-bike wiring harness and the switches. I found all the speedo lights were burned out so went by the Honda dealer and got those along with some new fuel line.

Fished the harness back in, followed the wiring diagram (except I have no turn signals to install), and put the battery back in. Turn the key on and...nothing! :censored: Couldn't even get the brake light to come on. Checked a few wires for continuity before I thought to reach in and check the ignition switch connection. Lo and behold, it had come loose when I was fishing the harness in. Reconnected, and there was life - sort of...

So here we come to my first :censored:-up of the project. I had the bright idea of opening up the (perfectly fine) ignition switch the other day just to clean the connections. When I got it apart, there were two springs and pins (?) that fell out and I did not see exactly how they were oriented. I went ahead and cleaned them and put them back in what I now know is the wrong way. When I turned the key, nothing happened at setting I or II, but the neutral light did come to life in between the stops :43:. I even got the horn adjusted to work. Apparently I had one or both pins in backwards.

So, I went and pulled out the ignition switch again and opened it up and changed around the pins. However, when I put the switch back together again, the solder joint for the ground to frame broke. I don't have any soldering experience, so was wondering how high a melting point we'd be talking to re-solder this joint? Would I melt the surrounding plastic if I tried to re-solder the ground?

Sometimes (even in other things) I just need to learn when to quit while I am ahead. :4:

At least I can say the new harness was in better shape. For the few minutes I left the battery in, there were no hot spots like with the old harness. And I even got the horn to toot as loud as the little piddly thing can go when the engine isn't running. So it was still a successful day in any case.
 

hornetgod

Well-Known Member
I learned my lesson the hard way on taking ignition switches apart. I don't mess with them. I buy them off Ebay as a matched set with the helmet lock so the keys match. It is hard to find them on Ebay but, if you are patient they do pop up every now and then.
 

cjpayne

Well-Known Member
I have rebuilt a couple of those switches myself and agree that they can be difficult. I have used gray heat shrink with great success.

Can you please tell me where you got the grey heatshrink. Does it look just like the factory stuff? From your pic it does. The other stuff I've seen isn't heatshrink. Thanks.
 
Last edited by a moderator:

hornetgod

Well-Known Member
Can you please tell me where you got the grey heatshrink. Does it look just like the factory stuff? From your pic it does. The other stuff I've seen isn't heatshrink. Thanks.

I bought it off a seller on Ebay. The same person sells different colors and sizes.
 

adzrules

Active Member
Today's Progress and a Question

After thinking last night about that ignition switch that needed re-soldering, I went out and took a look at it this morning. Before soldering, I checked continuity to make sure I had put the switch innards back the way they were supposed to be. I was lucky and had it right. So I took a soldering iron and held it on the ground wire lead until the solder point melted and that was good enough. It went back almost like new.

I reinstalled the ignition switch and battery, and lo and behold there was power - at the right stops in the ignition switch even. Now I know what the ignition switch innards look like, but I never want to do that again! One doesn't learn until one does something unintelligent, I guess.

On to the rest of the day...I went ahead and cleaned the steel fuel tank with Seafoam and let it soak for a while. Nothing really horrible came out, not even varnish to be seen in the tank, so I was happy. I installed new fuel line and inline filters. Fought the fuel tank to get it back in and had to do some gentle persuasion with a rubber mallet to get it in that last 1/2 inch so the cover would bolt in place. Cleaned the airbox and the rubber attached - probably will get new rubber boots in the future. Cleaned off the carb and checked all the external parts. I didn't go into the carb because I probably won't be able to have the time until summer, and I don't want to forget how things go together in the interim. Got everything back together and installed the battery.

So I had the bright idea to try and see if it would run. Regapped the plug to 0.015 inches which is what my shop manual said was in range. Added ethanol-free fuel with a bit of Seafoam added for cleaning purposes. Turned the key on and kicked her over, and over, and over again. Didn't get it to start, unfortunately.

I took out the spark plug and was curious if I was getting spark there - I had checked every other electrical part except that and the stator. Upon removal of the plug and grounding it to the frame and kicking over, there was nothing. So I pulled off the end of the plug wire to find there was no wire in there! :13: I had read where others would snip a 1/4 to 1/2 inch off the wire and try again, so I did that and did find some wire in there. Put everything back together and checked for spark - nothing.

So, where should I start looking in order to diagnose this issue? I'll do some searching on the forum, too, but if there is something in particular I need to check that would be most useful. I did not go and check the timing, I admit, though I'm not familiar enough with the electrical to know if that is related.

At least I am getting closer to getting it running. The rest of the electrical is fine - at least what I can test without the engine running, that is.
 

cjpayne

Well-Known Member
Check the connectors where the coil wire plugs into the harness. Sometimes when your fighting the fuel tank, these will get moved around or pulled on. Happened to me once.
 

Adam-NLV

Well-Known Member
Check the connectors where the coil wire plugs into the harness. Sometimes when your fighting the fuel tank, these will get moved around or pulled on. Happened to me once.
That's what I was gonna say. You can check it at the connector or at the coil itself.

I'd check it at the coil with a test lead that has a real sharp point, use it to penetrate the wire's insulation, should be > 100 volts AC.

That wire is called the primary.
The spark plug lead where you first found a problem.... called the secondary.
 
Top