Here are a few switches I have.
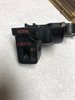
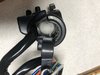
1. Bot half of a turn signal switch that has been notched out by PO
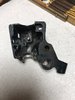
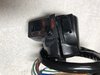
2. Used 76-78 Turn signal switch for 76-78
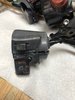
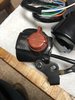
3. New turn signal switch that is electrically same as K4-78, but cable exits out the side and 10 mm mirror mount. Not a CT70 part but works fine.
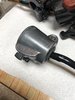
4. Used Engine kill switch that is electrically same as K4-78 but cable exits out the side and 10 mm mirror mount. Not a CT70 part but works fine.
Smoke 'em over and let me know if there is anything you like.
1. Bot half of a turn signal switch that has been notched out by PO
2. Used 76-78 Turn signal switch for 76-78
3. New turn signal switch that is electrically same as K4-78, but cable exits out the side and 10 mm mirror mount. Not a CT70 part but works fine.
4. Used Engine kill switch that is electrically same as K4-78 but cable exits out the side and 10 mm mirror mount. Not a CT70 part but works fine.
Smoke 'em over and let me know if there is anything you like.
Attachments
-
 Turn Signal Base2.jpg1.3 MB · Views: 92
 -
 Turn Signal Base1.jpg1.6 MB · Views: 108
 -
 Turn Signal Assy 76-78_1.jpg1.6 MB · Views: 107
 -
 Turn Signal Assy 76-78_2.jpg1.8 MB · Views: 116
 -
 Turn Signal Assy NOS Side exit.jpg1.5 MB · Views: 116
 -
 Turn Signal Assy NOS Side exit1.jpg1.5 MB · Views: 111
 -
 Engine Kill Switch Side Exit.jpg1.9 MB · Views: 90
Last edited:


")


 That's how ODB got to be an old dirty bastard!


