Tripod
Well-Known Member
Picked up this bike along with a k1 for 100$ each last November. I rebuilt the k1 first, and spent a good portion of the year on it. I learned alot and made most of the usual mistakes.
The bikes spent their life in the central valley of California on a farm, and probably taught a few generations how to ride. It looks like most of the welding hacks were to keep the bike running. A stud welded to the frame neck in front of the tank, and the usual welded up kick starter.
Pretty much the only salvageable parts are the frame, hubs, motor, carb, handlebar holder, and trees. The rest of the parts are going to have to be sourced which is going to take a lot of time and effort and dollars.
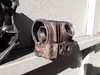
I started with the motor tear down this weekend. Again, I'm not sure what kind of life that had but it sure seems well-used. The tear-down went pretty smooth especially with a torch and impact driver.
I'm not sure exactly what killed the motor but it looks like when it did stop, both valves were closed because the piston was at top dead center and there was not as much damage on the Dome side of the head, and no pitted rust. Another thing that looks like it may have stopped the motor is the shift star was loose without even touching it, either that or the missing Kickstarter meant that the bike had to be bump started.
There wasn't any oil inside the engine just a ton of white residue and rust. It makes me wonder if the motor was flushed with fuel or some sort of solvent that left a white residue. The residue is similar to what was in the float bowl of the carburetor.
The disassembly was pretty smooth, and after seeing the damage I didn't have to bag nearly as many parts as on the other motor simply because they were basically just trash. One of the more difficult parts was getting the clutch cover off. Even though there wasn't a kick-start shaft what was left was bent just enough to make it impossible to get the clutch cover to slide off. Luckily it wasn't an early enough serial number to have a z 50 m cover. So I had the fun pleasure of cutting up the cover just to get it off.
Pretty much everything inside the engine is junk. I wasn't able to check the end play on the connecting rod because I think there's too much rust in there, and I haven't checked the shift forks either, but I will before I toss them just to see how worn everything is.
The case is going to need heli coils for the footpeg mounts, other than that it just looks like it got chipped buy the shift drum plug probably from when a chain exploded.
One thing that I did notice is that on the oil pump they used Big 8 bolts where on my Z50 K1's they used screws for the oil pump. The flywheel also seemed to be a bit different on the outer shape too.
I'm going to send the head out for new valve guides and vapor blast along with the cases first.
Ill post my progress. And plenty of pictures. I know you guys like alot of pictures.
Where does this motor rank on the scale from 1-10 in the house of horrors? Is it getting hall of fame consideration?
The bikes spent their life in the central valley of California on a farm, and probably taught a few generations how to ride. It looks like most of the welding hacks were to keep the bike running. A stud welded to the frame neck in front of the tank, and the usual welded up kick starter.
Pretty much the only salvageable parts are the frame, hubs, motor, carb, handlebar holder, and trees. The rest of the parts are going to have to be sourced which is going to take a lot of time and effort and dollars.
I started with the motor tear down this weekend. Again, I'm not sure what kind of life that had but it sure seems well-used. The tear-down went pretty smooth especially with a torch and impact driver.
I'm not sure exactly what killed the motor but it looks like when it did stop, both valves were closed because the piston was at top dead center and there was not as much damage on the Dome side of the head, and no pitted rust. Another thing that looks like it may have stopped the motor is the shift star was loose without even touching it, either that or the missing Kickstarter meant that the bike had to be bump started.
There wasn't any oil inside the engine just a ton of white residue and rust. It makes me wonder if the motor was flushed with fuel or some sort of solvent that left a white residue. The residue is similar to what was in the float bowl of the carburetor.
The disassembly was pretty smooth, and after seeing the damage I didn't have to bag nearly as many parts as on the other motor simply because they were basically just trash. One of the more difficult parts was getting the clutch cover off. Even though there wasn't a kick-start shaft what was left was bent just enough to make it impossible to get the clutch cover to slide off. Luckily it wasn't an early enough serial number to have a z 50 m cover. So I had the fun pleasure of cutting up the cover just to get it off.
Pretty much everything inside the engine is junk. I wasn't able to check the end play on the connecting rod because I think there's too much rust in there, and I haven't checked the shift forks either, but I will before I toss them just to see how worn everything is.
The case is going to need heli coils for the footpeg mounts, other than that it just looks like it got chipped buy the shift drum plug probably from when a chain exploded.
One thing that I did notice is that on the oil pump they used Big 8 bolts where on my Z50 K1's they used screws for the oil pump. The flywheel also seemed to be a bit different on the outer shape too.
I'm going to send the head out for new valve guides and vapor blast along with the cases first.
Ill post my progress. And plenty of pictures. I know you guys like alot of pictures.
Where does this motor rank on the scale from 1-10 in the house of horrors? Is it getting hall of fame consideration?
Attachments
-
 20180516_175716.jpg2.5 MB · Views: 186
 -
 20181018_133240.jpg3.3 MB · Views: 187
 -
 20181018_133252.jpg1.5 MB · Views: 193
 -
 20181018_133258.jpg1.1 MB · Views: 189
 -
 20181018_133246.jpg3.5 MB · Views: 189
 -
 20181018_134715.jpg1.8 MB · Views: 197
 -
 20181018_140001.jpg1.4 MB · Views: 180
 -
 20181018_141205.jpg1.9 MB · Views: 191
 -
 20181018_141211.jpg1,017.2 KB · Views: 198
 -
 20181018_150613.jpg3.4 MB · Views: 189
Last edited:


 .
.